
Stumpwork has fascinated me from the start. Stumpwork, if you don’t know, is a type of embroidery that creates a 3-dimensional effect. This can be done with everything from stitching over padded stuffing to wire-rimmed leaves and insect wings that sprout from the fabric – and so, so much more. I love the texture possibilities with stumpwork, and the fact that your embroidery can curl off of the background towards you. There’s also something appealingly realistic to a piece with literal dimension. I’ve wanted to play with this for a long time.
The thing about stumpwork is that it’s hard to find free resources online. Unlike most embroidery techniques, you won’t fin a ton of tutorials for pulling off the various effects. There’s a limited number of books, and if you’ve got a lot of cash to throw around there’s classes. I do not have a lot of cash to throw around, and while I did buy a stumpwork book, I realized too late that it assumes the reader already knows the basics – which I do not. So I decided to go a little easy on my first Stumpwork project.
I’d gotten the idea that I wanted to make something with berries. Actually, I’d made a type of stumpwork raspberry before on a bag I made for my mother using French knots and a bit of stuffing. This time I wanted to make berries by wrapping DMC floss around wooden beads. I’d seen this technique mentioned before, and although I couldn’t find a good tutorial on how to pull them off, I figured the best way to learn was to try and see what happens.
I’d been inspired by something I’d seen that used lines of variously gray stitching. I can’t remember what the original image was supposed to be, but I remember looking at it and thinking, “Gosh that looks like an oyster shell,” and thus was born the design for my first stumpwork pillow: An oyster shell wreathed in a sprig of blueberry and a sprig of beach rose – veiled references to two of my “home away from home” spots.
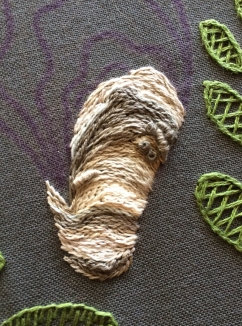
Turns out that oyster shell was a BEAST. The thin lines of color all close together meant it took forever to get not much done. I used a combination of stem and chain stitches to give it a bit of texture, as well as bouillon and French knots to make rough patches and tiny barnacles. The effect turned out about what I wanted it to be. I’m sure if I work
ed on sketching and color I could do even better – maybe even used a bit of padding to give it the classic arch of an oyster shell. The upside is, I got some great practice on stem stitch, which I struggle with.
I wanted the stems of the wreath to have some feel to it, too. First I stitched the stems in chain stitch with DMC cotton floss, decreasing from 4-ply at the thickest parts to 2-ply at the thinnest, then I wrapped them in overcast stitches. The end result is not as neat as I would have liked – partially from needing more practice, but partially also because the thinnest parts were really too thin for this technique. It would have been better to try stem stitch on the thin parts, or have the whole thing a few degrees thicker.
Once I had the stems and leaves in, I moved on to the flowers. The blueberry flowers were pretty simple – satin stitch “bells” with tiny scroll stitch ends for the ruffles. The beach rose was a bit more interesting. Unlike most other roses, beach rose doesn’t have many layers of petals; there’s typically just one or two layers, making it relatively simple to draw. Beach rose flowers also have a delightful fuzz of bright yellow stamens at the center. Naturally, I used turkey stitch for this, with French knots at the very center for the flat pistil. The resulting stitched flowers were very bright and colorful, but in the future I’ll have to be more careful about proportions. The petals are far too small for the stamen-and-pistil center. Also, because the petals are so short, the light pink I used around the base of the petals is almost completely hidden by the turkey stitch. Ah well, something to keep in mind for next time!


With everything else done, it was finally time for the berries! Part of why I picked these two berries were because they both have smooth round bodies with something interesting at the end – little ruffles for the blueberries and pointed “tassels” for the rose hips.
I didn’t find any examples for stumpwork rose hips, but I knew what I wanted to do. After wrapping the wooden beads (I’d picked ones slightly larger than the beads I’d use for the blueberries, since rose hips are about two to three times the size in real life) I used woven picots stitched right around the rim of the hole to represent the tassels. It took a bit of finagling to anchor both the bead and the picot so I could make the weave, but it really does look like the real thing.
I was probably most excited for the blueberries. I’d seen tons of examples of stumpwork blueberries, many made with wooden beads. Most of the examples I didn’t like – I’d seen trellis stitches made around the bead, but I wanted smooth sides; I’d seen just plainly wrapped beads, but what about the ruffles blueberries have at one end? There was one reference picture I found that was exactly what I wanted, but I couldn’t find anything to say how they achieved the distinctive ruffles. Finally, after many hours of searching, I found mention in the blub of a link in Google search that button hole stitch might have been used on the berries. I clicked the link and found no confirmation on the page itself, but fine. I could at least work with that much.
I had no idea how to do buttonhole stitch around lines of parallel-running thread, so I decided to just.. try it? And it worked! Because the threads get so crowded inside the wooden bead’s hole, they hold in place really well and I was able to do buttonhole stitch around the rim no problem. And the effect was just what I wanted – blue round berries with little ruffles on one end.


And that was it! -For the embroidery. I had convinced myself there was no way to finish this pillow if it didn’t have a rope cord trim. I’d gotten some nice colorful rope cord somewhere that happened to work really well with the colors in the design. I did a whole bunch of research on how to use a sewing machine to sew on the rope cord. Then I went out to find the right foot – no luck. I got one that could maybe sort of work anyway, came home – only to discover the foot had the wrong kind of attachment for my sewing machine. And actually, it turns out that even if I had the right foot, my machine won’t lift the foot high enough for the rope cord to fit under it – a problem, since you have to pass the needle through part of the cord in order to get the right seam.
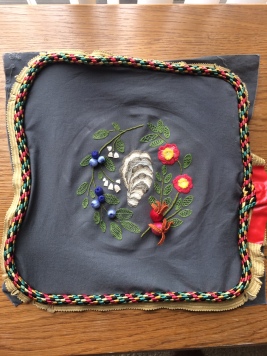
Instead of giving up, I decided to hand sew the rope cord. In many ways this was a terrible decision. The rope cord was bulky and hard to keep in place. It was thick, and often I had to use rubber pads and thimbles to force my needle through it. It was hell trying to make any semblance of neat stitches, much less straight seams. This was especially true where the two ends of the rope cord met – an unraveling, tape-covered mess where I’d tried to weave the rope cord ends together to hide the seam.
After all that work, I have to say it did look pretty neat. It was worth the effort – but I’ll be using rope cord sparingly now, until I have a machine that can do all that work for me.

Leave a comment